JEDI Testing
Each JEDI bundle has its own suite of tests. To run them, first build and compile the bundle as described in our bundle build page. Step 5 in that building and compiling procedure is to test the code with ctest. This step is described in the following section.
After describing the basic functionality of ctest, we proceed to give a more detailed overview of how tests are organized and implemented in JEDI. This is a prelude to the next document, which describes how you – yes you! – can implement your own JEDI unit tests.
Running ctest
The standard practice after building and compiling a JEDI bundle is to run ctest with no arguments in order to see if the bundle is operating correctly.
First you need to run ulimit -s unlimited (on a linux machine; you may not be able to do this on Mac OS) to ensure that you don’t encounter memory or stack size issues. Then you can test your build with:
cd <build-directory>
ctest
This will run all tests in the test suite for that bundle. This can take a while so be patient. When the tests are complete, ctest will print out a summary, highlighting which tests, if any, failed. For example:
98% tests passed, 2 tests failed out of 130

Label Time Summary:
boost         = 2253.85 sec (75 tests)
executable    = 2253.85 sec (75 tests)
fv3jedi       = 2241.67 sec (10 tests)
mpi           = 2242.21 sec (11 tests)
oops          =  28.63 sec (111 tests)
script        =  26.18 sec (55 tests)
ufo           =   9.73 sec (9 tests)

Total Test time (real) = 2280.20 sec

The following tests FAILED:
        123 - test_fv3jedi_aninit (Failed)
        130 - test_fv3jedi_localization (Timeout)
Errors while running CTest
If you want to run a single test or a subset of tests, you can do this with the -R option, for example:
ctest -R test_fv3jedi_linearmodel # run a single test
ctest -R test_qg* # run a subset of tests
The output from these tests (stdout) will be printed to the screen but, to allow for greater scrutiny, it will also be written to the file LastTest.log in the directory <build-directory>/Testing/Temporary. In that same directory you will also find a file called LastTestsFailed.log that lists the last tests that failed. This may be from the last time you ran ctest or, if all those tests passed, it may be from a previous invocation.
If you’re not happy with the information in LastTest.log and you want to know more, you can ask ctest to be verbose
ctest -V -R test_fv3jedi_linearmodel
…or even extra-verbose (hypercaffeinated mode):
ctest -VV -R test_fv3jedi_linearmodel
The -V and even -VV display the output messages on the screen in addition to writing them to the LastTest.log file. However, sometimes the amount of information written to LastTest.log isn’t much different than if you were to run ctest without these options, particularly if all the tests pass.
Another way to get more information is to set one or more of these environment variables before you run ctest:
export OOPS_DEBUG=1
export MAIN_DEBUG=1
export OOPS_TRACE=1
The first two enable debug messages within the JEDI code that would not otherwise be written. The second produces messages that follow the progress of the code as it executes. These tools are provided by eckit. Though higher values of these variables could in principle be set, few JEDI routines exploit this functionality. So, setting these variables to values greater than 1 will make little difference. Both can be disabled by setting them to zero.
You can also display the output messages only for the failed tests by using --output-on-failure
ctest --output-on-failure
ctest also has an option to only re-run the tests that failed last time:
ctest --rerun-failed
To see a list of tests for your bundle without running them, enter
ctest -N
For a complete list of ctest options, enter man ctest, ctest --help, or check out our JEDI page on CMake and CTest. As described there, CTest is a component of CMake, so you can also consult the CMake online documentation for the most comprehensive documentation available.
Manual Execution
You can also run the executable test files directly, without going through ctest. To do this, first find the executable in the build directory. Unit tests are typically found in one of the test directories that branch off each repository name. For example, test_qg_state can be found in <build-directory>/oops/qg/test and test_ufo_geovals can be found in <build-directory>/ufo/test. Then just cd to that directory and run the executable from the command line, specifying the appropriate input (configuration) file, e.g.
test_qg_state testinput/interfaces.yaml
You can determine which executable and which configuration file each test uses by viewing the CMakeLists.txt file in the corresponding test directory of the repository. If you’re running the ufo bundle, then the relevant CMakeLists.txt files for the examples above would be <src-directory>/ufo-bundle/oops/qg/test and <src-directory>/ufo-bundle/ufo/test. Just open the relevant CMakeLists.txt file and search on the name of the test. See Adding a New Test for further details on how to interpret the syntax.
If you do run the tests without ctest, keep in in mind a few tips. First, the test name is not always the same as the executable name. Second, since the the integration and system tests generally focus on JEDI Applications (other than oops::Test objects - see below) they usually have a .x extension. Furthermore, these executables are generally located in the <build-directory>/bin directory as opposed to the test directories. For example, to run test_qg_truth from the <build-directory>/oops/qg/test directory, you would enter the following:
../../../bin/qg_forecast.x testinput/truth.yaml
The JEDI test suite
What lies “under the hood” when you run ctest? Currently, there are two types of tests implemented in JEDI:
Unit tests
Integration and system tests (aka Application tests)
This does not include other types of system and acceptance testing that may be run outside of the CTest framework by individual developers and testers. Integration and system tests are referred to as Application tests for reasons that will become clear in the next section.
Unit tests are implemented in JEDI using the eckit unit testing framework
for initializing and organizing our suite of unit tests. See below for details on how tests are implemented.
Unit testing generally involves evaluating one or more Boolean expressions during the execution of some particular component or components of the code. For example, one can read in a model state from an input file and then check whether some measure of the State norm agrees with a known value to within some specified tolerance. Alternatively, one can test whether a particular variable is positive (such as temperature or density) or whether a particular function executes without an error.
By contrast, Application tests check the operation of some application as a whole.
Some may make use of eckit boolean tests but most focus on the output that these applications
generate. For example, one may wish to run a 4-day forecast with a particular model
and initial condition and then check to see that the result of the forecast matches
a well-established solution. This is currently done by comparing the test output
to an analogous “reference” output file from a previous execution of the test.
Such reference files are included in many JEDI repositories and can generally be
found in a test/testoutput subdirectory. See Integration and System testing for details.
As mentioned above, each JEDI bundle has its own suite of tests and you can list them (without running them) by entering this from the build directory:
ctest -N
Though all tests in a bundle are part of the same master suite, they are defined within each of the bundle’s individual repositories. Furthermore, you can generally determine where each test is defined by its name. For example, all test_qg_* tests are defined in oops/qg; all test_ufo_* tests are defined in ufo; all test_fv3jedi_* tests are defined in the fv3-jedi repo, and so on.
With few exceptions, all JEDI repositories contain a test directory that defines the tests associated with that repository. oops itself is one exception because it orchestrates the operation of the code as a whole but there you will find archetypical test directories within the qg and l95 model directories.
Within each test directory you will find a file called CMakeLists.txt. This is where each test is added, one by one, to the suite of tests that is executed by CTest. As described in the CMake documentation, this is ultimately achieved by repeated calls to the CMake add_test() command.
However, the ecbuild package offers a convenient interface to CMake’s add_test() command called ecbuild_add_test(). For further details on how to interpret this argument list see Adding a New Unit Test.
Since it relies on the net result of an application, each Application test is typically associated with a single CTest executable. However, applications of type oops::Test (see next section) will typically execute multiple unit tests for each executable, or in other words each item in the CTest suite. So, in this sense, the suite of unit tests is nested within each of the individual tests defined by CTest. And, it is this nested suite of unit tests. (see below).
Tests as Applications
The JEDI philosophy is to exploit high-level abstraction in order to promote code flexibility, portability, functionality, efficiency, and elegance. This abstraction is achieved through object-oriented design principles.
As such, the execution of the JEDI code is achieved by means of an Application object class that is defined in the oops namespace. As illustrated in the following class hierarchy, oops::Test is a sub-class of the oops::Application class, along with other applications such as individual or ensemble forecasts:
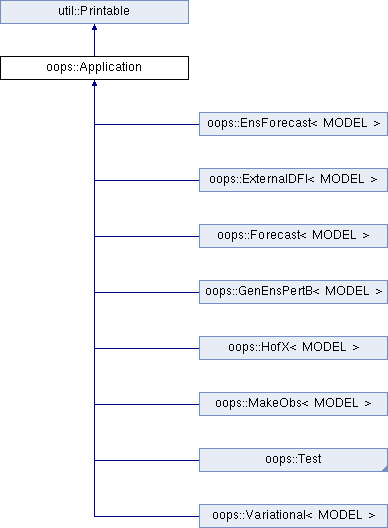
Unit tests are implemented through oops::Test objects as described in this and the following sections. The other type of test in the JEDI test suite, namely Application tests, generally check the operation of JEDI applications as a whole - the same applications that are used for production runs and operational forecasting. In other words, application tests are used to test the operation of the Application classes in the diagram above that are not sub-classes of oops::Test.
To appreciate how a JEDI Application is actually run, consider the following program, which represents the entire (functional) content of the file oops/qg/test/executables/TestState.cc:
int main(int argc,  char ** argv) {
  oops::Run run(argc, argv);
  test::State<qg::QgTraits> tests;
  run.execute(tests);
  return 0;
};
This program begins by defining an object of type oops::Run, passing the constructor the arguments from the command line. These command-line arguments generally include a configuration file that specifies the parameters, input files, and other information that is necessary to run the application (in this case, a test).
Then the program proceeds to define an object of type test::State<qg::QgTraits> called tests, which is a sub-class of oops::Test as illustrated here:
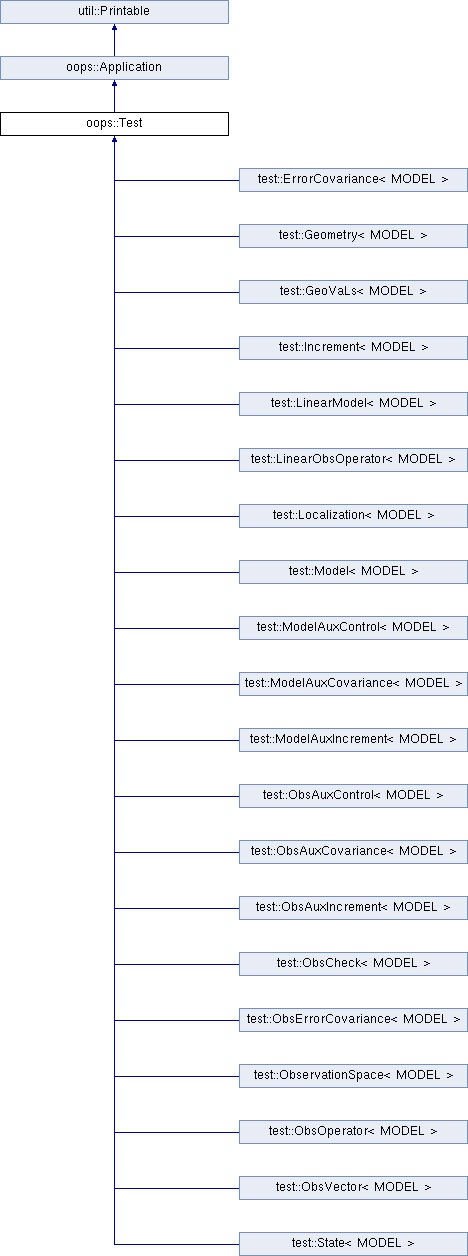
Since test::State<qg::QgTraits> is a sub-class of oops::Test (through the appropriate instantiation of the test::State<MODEL> template), then the tests object is also an Application (oops::Application).
So, after defining each of the objects, the program above proceeds to pass the Application object (tests) to the execute() method of the oops::Run object. Other applications are executed in a similar way.
Source code for the executable unit tests in a given JEDI repository can typically be found in a sub-directory labelled test/executables or test/mains. Similarly, the source code for executable JEDI Applications that are not oops::Test objects can typically be found in a mains directory that branches from the top level of the repository.
Initialization and Execution of Unit Tests
As described above, an oops::Test object is an application that is passed to the execute() method in an oops::Run object. To describe what happens next, we will continue to focus on the test_qg_state example introduced in the previous section as a representative example.
First, it is important to realize that the test::State<Model> class is not the same as the oops::State<Model> class. The former is an application as described in the previous section whereas the latter contains information about and operations on the current model state.
Second, as an application, a test::State<Model> object also has an execute() method, which is called by the execute() method of the oops::Run object as shown here (code excerpt from oops/src/oops/runs/Run.cc):
void Run::execute(const Application & app) {
  int status = 1;
  Log::info() << "Run: Starting " << app << std::endl;
  try {
    status = app.execute(*config_);
  }
  [...]
The execute() method for an oops::Test is defined in the
file oops/src/oops/runs/Test.h. The main purpose of this routine is
to initialize and run the suite of unit tests.
The execute() method in each oops::Test object then proceeds to register the tests with oops::Test::register_tests() and run them with a call to eckit’s run_tests() function (argc and argv are parsed from the args variable above):
// Run the tests
  Log::trace() << "Registering the unit tests" << std::endl;
  register_tests();
  Log::trace() << "Running the unit tests" << std::endl;
  int result = eckit::testing::run_tests(argc, argv, false);
  Log::trace() << "Finished running the unit tests" << std::endl;
  Log::error() << "Finished running the unit tests, result = " << result << std::endl;
So, the real difference between different oops::Test objects is encapsulated in the oops::Test::register_tests() method. Each test application (i.e. each item in ctest’s list of tests) will register a different suite of unit tests.
In the case of test::State<MODEL> (which you may recall from the previous section is a sub-class of oops::Test), this method is defined as follows (see oops/src/test/interface/State.h):
void register_tests() const {
  std::vector<eckit::testing::Test>& ts = eckit::testing::specification();

  ts.emplace_back(CASE("interface/State/testStateConstructors")
    { testStateConstructors<MODEL>(); });
  ts.emplace_back(CASE("interface/State/testStateInterpolation")
    { testStateInterpolation<MODEL>(); });
}
This is where the eckit unit test suite is actually initiated: A ts object is created by calling specification(), tests are added to testing suite ts by emplace_back.
Note that all this occurs within the test::State<MODEL> class template so there will be a different instance of each of these unit tests for each model. So, our example application test_qg_state will call test::State<qg:QgTraits>::register_tests() whereas other models and other applications (as defined in other sub-classes of oops::Test - see above) will register different unit tests.
So, in short, members of the ctest test suite are added by means of ecbuild_add_test() commands in the appropriate CMakeLists.txt file (see above) while members of the nested unit test suite are added by means of the oops::Test::register_tests() method.
Anatomy of a Unit Test
Let’s continue to use test_qg_state as an example in order to illustrate how unit tests are currently implemented in JEDI. As described in the previous two sections, the execution of this test (a single test from the perspective of ctest) will call test::State<qg:QgTraits>::register_tests() to register a suite of unit tests and it will call eckit::testing::run_tests() to run them.
As demonstrated in the previous section, this particular suite of unit tests includes two members, namely testStateConstructors<MODEL>() and TestStateInterpolation<MODEL>(), with MODEL instantiated as qg:QgTraits. What happens when we run one of these unit tests?
Here we will focus on the first, TestStateConstructors<MODEL>(). Both are defined in oops/src/test/interface/State.h, where you will find this code segment:
template <typename MODEL> void testStateConstructors() {
  typedef StateFixture<MODEL>   Test_;
  typedef oops::State<MODEL>    State_;

  const double norm = Test_::test().getDouble("norm-file");
  const double tol = Test_::test().getDouble("tolerance");
  const util::DateTime vt(Test_::test().getString("date"));

  // Test main constructor
  const eckit::LocalConfiguration conf(Test_::test(), "StateFile");
  const oops::Variables vars(conf);
  boost::scoped_ptr<State_> xx1(new State_(Test_::resol(), vars, conf));

  EXPECT(xx1.get());
  const double norm1 = xx1->norm();
  EXPECT(oops::is_close(norm1, norm, tol));
  EXPECT(xx1->validTime() == vt);

  [...]
This starts by defining Test_ as an alias for the StateFixture<MODEL> class. Other test objects also have corresponding fixture classes, for example test::ModelFixture<MODEL>, test::ObsTestsFixture<MODEL>, etc. These are primarily used to access relevant sections of the configuration file. In the above example, they are used to extract a reference value for the State norm, a tolerance level for the norm test, and a reference date for the State object that is about to be created.
Then the “StateFile” section of the config file is extracted through the StateFixture and, together with information about the geometry (in Test_::resol()), is used to create a new State object called *xx1 (boost::scoped_ptr<> is a type of smart pointer defined by Boost similar to std::unique_ptr<> in C++11).
Then the unit tests really begin, with multiple calls to check Boolean expressions, including exit codes. The first call to EXPECT() checks to see if the pointer is properly defined with the help of the get() method of boost::scoped_ptr<>. In other words, it checks to see if a State object was successfully created.
The call to EXPECT(oops::is_close(norm1, norm, tol)) then checks to see if the norm that was read from the configuration file is equal to the value computed with the norm() method of the State object, with the specified tolerance.
EXPECT() with double equal sign is used to verify that the State object is equal to the reference value read from the configuration file.
The function above then proceeds to perform similar tests for the copy constructor (not shown).
If any of these nested unit tests fail, ctest registers a failure for the parent application and an appropriate message is written to the ctest log file (as well as stdout if ctest is run in verbose mode).
Integration and System (Application) Testing
Though each executable in a CTest suite may run a number of unit tests as described in the previous two sections, others are used for higher-level integration and system testing. As described in The JEDI Test Suite above, these application tests are implemented by comparing the output of these executables to known solutions.
Reference files define these known solutions and are found in
the test/testoutput directory of JEDI repositories.
For example, test_qg_state is a unit test suite (Type 1) as opposed to an Application test (Type 2) so it does not have a reference output file.
However, as an Application test, test_qg_truth does have such a file, which is named truth.test. This file includes all the messages written using oops::Log::test() command such as:
Initial state: 13.1
Final state: 15.1417
This lists the norm of the initial and final states in an 18 day forecast. So, the ostensibly sparse contents of this file are misleading: a lot of things have to go right in order for those two data points to agree precisely!
Currently, there are two comparing methods implemented in JEDI. One uses compare.py and
the other compares the test output and the reference file internally as the final step of the C++ executable. Eventually all tests will use the C++ comparison rather than compare.py.
Testing using compare.py
Warning
The compare.py script is being replaced by a new method of testing
using the internal test reference comparison
compare.py (or in some repository compare.sh) takes run file (test output), reference file (established solution), float tolerance, and integer difference as input and can be used as:
compare.py run_file ref_file float_tolerance integer_difference
Tolerance values are used to allow for small differences between test output and the reference values.
Float tolerance is the maximum relative difference between floating numbers in the run file and the reference file.
Integer difference is the maximum difference between integer numbers in the run file and the reference file.
Example below shows how compare.py can be used with ecbuild_add_test to add a
test for comparing test output with a reference file. You can find more examples in test/CMakeLists.txt in different JEDI repositories
ecbuild_add_test( TARGET       test_fv3jedi_forecast_fv3-gfs_compare
                  TYPE         SCRIPT
                  COMMAND      ${CMAKE_BINARY_DIR}/bin/compare.py
                  ARGS         testoutput/forecast_fv3-gfs.run testoutput/forecast_fv3-gfs.ref 1.0e-3 0
                  TEST_DEPENDS test_fv3jedi_forecast_fv3-gfs )
When the test is executed, the compare.py script in the test directory
of the repository (which also has a soft link in the build directory) will compare
the output file to the reference file by first extracting the lines that begin
with “Test” (using grep) and then comparing the (text) results (using diff).
In our example, the two files to be compared are test.truth and test.truth.test.out.
If these do not match, ctest registers a failure.
Testing using the internal test reference comparison
Alternatively, comparison of the test log and reference file can be done internally as the final step of the C++ execution, removing the need for compare.py. The test section of the test’s YAML configuration is used to control the test-reference comparison.
For example, the test: section in an application test’s YAML file might look like:
test:
  reference filename: testoutput/4dvar.obsbias.test
  #  Optional:
  float relative tolerance: 0.0
  integer tolerance: 0
  log output filename: testoutput/4dvar.obsbias.log.out
  test output filename: testoutput/4dvar.obsbias.test.out
The reference filename specifies the reference file name that will be used to compare with the test output channel.
The test channel output and the reference file are compared line-by-line, and must contain the same number of lines. If there are no numeric elements in the lines, they must match exactly. Lines that contain numeric elements are compared numerically. Each line must have the same count of numeric elements, and each of the numeric elements must be within tolerance. Tolerance values for integer and floating-point variables may optionally be specified but default to 0. If numeric elements from the test and reference files parse as integers, the integer tolerance controls the acceptable tolerance. Otherwise, numeric values are treated as floating point, and the float relative tolerance controls the acceptable relative difference between floating-point values.
relative_difference = |reference - test|/(0.5*(reference + test))
You may choose to use float absolute tolerance if you prefer, and in this case the comparison will be done using the absolute difference instead of relative for all the float numbers in the test. This can be useful when comparing very small numbers too close to zero. If you specify both float relative tolerance and float absolute tolerance in the yaml file, the absolute comparison will be used and a warning will be generated.
absolute_difference = |reference - test|
If the test channel fails to match the reference file, an exception from a sub-class of oops::TestReferenceError containing relevant information about the cause of the mismatch is thrown.
Additional options for the test: YAML sub-section:
log output filename- (Optional) A file to save the complete log output.test output filename- (Optional) A file to save the test-channel specific log output. This file can be used to replace the test reference file when needed.
After adding the test section to the YAML file, the test can simply be added in test/CMakeLists.txt
using ecbuild_add_test:
ecbuild_add_test( TARGET test_l95_4dvar.obsbias
                  COMMAND l95_4dvar.x
                  ARGS testinput/4dvar.obsbias.yaml
                  TEST_DEPENDS test_l95_forecast test_l95_makeobsbias )
Note
An advantage of the internal comparison method is that filenames are not hard-coded into the CMakeLists.txt. Instead, they are easily modified in the test’s YAML file without triggering the CMake configuration phase to rerun on each build. In most cases, this will lead to faster rebuilds when developing and debugging application tests.
JEDI Testing Framework
In this document we have described how unit tests are implemented as oops::Test (Application) objects and we have described how they are executed by passing these Application objects to an oops::Run object. We have focused on the oops repository where this testing framework is currently most mature. However, the ultimate objective is to replicate this structure for all JEDI repositories.
Using oops as a model, the objective is to have the test directory in each JEDI repository mirror the src directory. So, ideally, every class that is defined in the src directory will have a corresponding test in the test directory. Furthermore, each of these tests is really a suite of unit tests as described above.
Let’s consider ufo as an example. Here the main source code is located in ufo/src/ufo. In particular, the .h and .cc files in this directory define the classes that are central to the operation of ufo. For each of these classes, there should be a corresponding .h file in ufo/test/ufo that defines the unit test suite for objects of that class. These are not yet all in place, but this is what we are working toward. The same applies to all other JEDI repositories.
Each unit test suite should be defined as a sub-class of oops::Test as described above. Then it can be passed to an oops::Run object as an application to be executed.
For further details on how developers can contribute to achieving this vision, please see Adding a New Test.