Doxygen
We at JEDI use Doxygen for generating man pages, inheritance diagrams, call trees and other types of html documentation that is linked to specific blocks of source code such as classes, functions, and subroutines. For generating web-based manuals, guides, and tutorials we use Sphinx.
Doxygen is open-source software that was developed by Dimitri van Heesch and is distributed under the GNU General Public License. For further information on the project see the Doxygen home page and for extensive documentation on how to use it see:
In what follows we give practical tips on how to use Doxygen within the context of JEDI.
Note
The most important part of this document are the instructions on how to add Doxygen documentation to C++ and Fortran code
Don’t worry about the details of how to use Doxywizard. This is optional. Doxygen configuration files are included with most JEDI bundles and if you want to see the output you can just enable the Doxygen build when you build the bundle and view output with a normal web browser.
Also, as the project proceeds, the JEDI team will provide web pages where you can view the Doxygen html output for current develop branches and prior releases. Stay tuned to this site for further details.
All we ask is that you document any code that you add.
Installing Doxygen
Doxygen is included in the JEDI CharlieCloud and Singularity containers and may already be installed on your system. To check whether it is already installed in your environment, just type this at the command line:
doxygen --help
If it is not already installed, you can obtain executable binary files for Mac OS X, Linux, and Windows through the Doxygen web page or you can download the source code from GitHub and build it yourself.
Alternatively, if you have a Mac, you can install Doxygen with Homebrew
brew install doxygen # (Mac only)
Depending on how you install Doxygen, you may be prompted for optional add-ons, including Doxywizard and Graphviz. We recommend that you say yes to both. Doxywizard is a convenient Graphical User Interface (GUI) for configuring and running Doxygen and Graphviz is a plotting package that will enable you to generate inheritance diagrams and call trees.
In particular, Graphviz includes an interpreter for the DOT graphical display language. A dot interpreter might already be installed on your system. For example, if you installed doxygen via Homebrew or if you use the JEDI Charliecloud or Singularity container, you may not need to install anything else. To check, try running:
dot --help
If it’s not already there you can install Graphviz using the executable binaries available from their download site or you can install it explicitly with Homebrew:
brew install graphviz # (Mac only)
Documenting C++ source code
There are several ways to include Doxygen documentation in C++ source files. We recommend the Qt style, as illustrated in this example:
// -----------------------------------------------------------------------------
/*! \brief Example function
*
* \details **myfunction()** takes a and b as arguments and miraculously creates c.
* I could add many more details here if I chose to do so.  I can even make a list:
* * item 1
* * item 2
* * item 3
*
* \param[in] a this is one input parameter
* \param[in] b this is another
* \param[out] c and this is the output
*
* \author L. Skywalker (JCSDA)
*
* \date A long, long, time ago: Created
*
* \warning This isn't a real function!
*
*/
void myfunction(int& a, int& b, double& c) {
   [...]
Since these directives are located within comment blocks, they do not affect the compilation of the code.
A few things to note. First, the documentation for a function or class comes in a Doxygen comment block immediately before the function or class is defined. The Doxygen block begins with /*! and ends with */. Each line in between begins with *. Doxygen commands are indicated with \ or, alternatively, @. \brief gives a brief description that will appear in html and other lists whereas \details gives further details as would appear in a man page. \param describes the arguments of the function while multiple \author and \date items can provide a history, tracking the function’s development. \warning provides useful usage tips to the user or developer.
These are only the essentials; there are many more…
…described in the online manual.
Note also that Doxygen supports Markdown language features for further formatting of the output. Examples of Markdown above include the asterisks in **myfunction()** (bold type) and the bulleted list.
Doxygen also supports latex for including formulae in latex and html output. Latex math mode is delimited by \f$ symbols as follows:
/*! ...
* This is an equation: \f$\nu = \sqrt{y_2}\f$
*/
Note - if you are configuring doxygen yourself, you must enable the USE_MATHJAX option in order for latex formulae to compile. If you are using the default Doxyfile provided with the repository, there is no need for any action on your part - Mathjax is already enabled.
Documenting Fortran source code
Including Doxygen documentation in Fortran is similar to C++ as described above, but with appropriate Fortran comment indicators. Also, the Doxygen parameter descriptions can follow the argument declarations as demonstrated here:
! -----------------------------------------------------------------------------
!> \brief Example function
!!
!! \details **myfunction()** takes a and b as arguments and miraculously creates c.
!! I could add many more details here if I chose to do so.  I can even make a list:
!! * item 1
!! * item 2
!! * item 3
!!
!! \author L. Skywalker (JCSDA)
!!
!! \date A long, long, time ago: Created
!!
!! \warning This isn't a real function!
!!

subroutine myfunction(a, b, c)
   integer, intent(in)              :: a !< this is one input parameter
   integer, intent(in)              :: b !< this is another
   real(kind=kind_rea), intent(out) :: c !< and this is the output
   [...]
The Doxygen code block here begins with !>, and subsequent lines begin with !!. The parameter definitions begin with !<. The supported Doxygen commands are the same as in C++.
Running Doxygen and Viewing the Results
You may never need to run Doxygen yourself. As noted above, the JEDI team plans to provide Doxygen-generated html output on public web sites for specific JEDI releases and for the current develop branches. This is still in preparation.
But, if you have added Doxygen documentation to a feature branch that you are working on, you may want to see how it looks before doing a pull request. This is straightforward to do.
If you are working with a particular JEDI bundle, then it is likely that this bundle is equipped to build the Doxygen documentation. Just edit the CMakeLists.txt file in the top level of the bundle repository (e.g. fv3-bundle) and look for a code snippet that resembles this:
# Build Doxygen documentation
option(BUILD_UFO_BUNDLE_DOC "Build documentation" ON)
Just make sure this is set to ON.
Then, proceed to build jedi as normal, running ecbuild and make from a build directory <build-dir> (this should be different than the location of the source code). The Doxygen html output will then be located in a directory called <build-dir>/Documentation/html. Just load any of the html files in this directory into your browser and navigate the the Main Page using the menu at the top.
You can also run Doxygen manually, as follows
mkdir -p <build-dir>/Documentation
cd <build-dir>/Documentation
ecbuild <path-to-config-file>
doxygen
Then, as with the automated bundle build, the Doxygen-generated html output will be located in the directory <build-dir>/Documentation/html and you can view it with a web browser by loading any of the html documents that you see there.
Note that these manual instructions are specifically for JEDI repositories. In this case, the <path-to-config-file> should point to a directory that includes a file called Doxyfile.in. Examples include the Documentation subdirectories in the fv3-bundle, or oops repositories. The ecbuild step above converts this into a Doxyfile with the proper path information.
Alternatively, If you create your own Doxyfile with Doxywizard or with doxygen -g, then you can skip the ecbuild step and just run the doxygen command from the same directory as the Doxyfile (you could also specify the configuration file explicitly with the -g option to doxygen).
Or, you can generate the html output and view it using the Run Doxygen and Show HTML Output buttons on the Doxywizard GUI.
The JEDI source code already has some Doxygen documentation within it. So, even before you add your own documentation, you can run Doxygen on a particular JEDI repo and view the results. We currently use Doxygen to generate html files but it can also be configured to produce man pages and latex output.
Note
If you use a custom configuration file generated by Doxywizard or some other means, then the output will be located in whatever directory is specified by the OUTPUT_DIRECTORY declaration in the Doxyfile. This may be different than as described here.
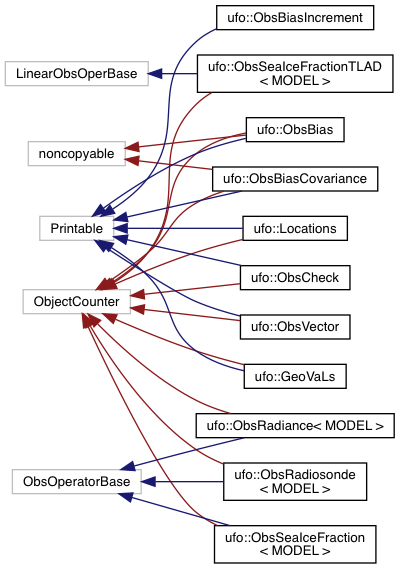
After you load some html document from the Doxygen tree into your web browser, then you can use the menus to peruse the files, functions, namespaces, classes, etc. Selecting Classes-Class Hierarchy will give you an inheritance diagram like this:
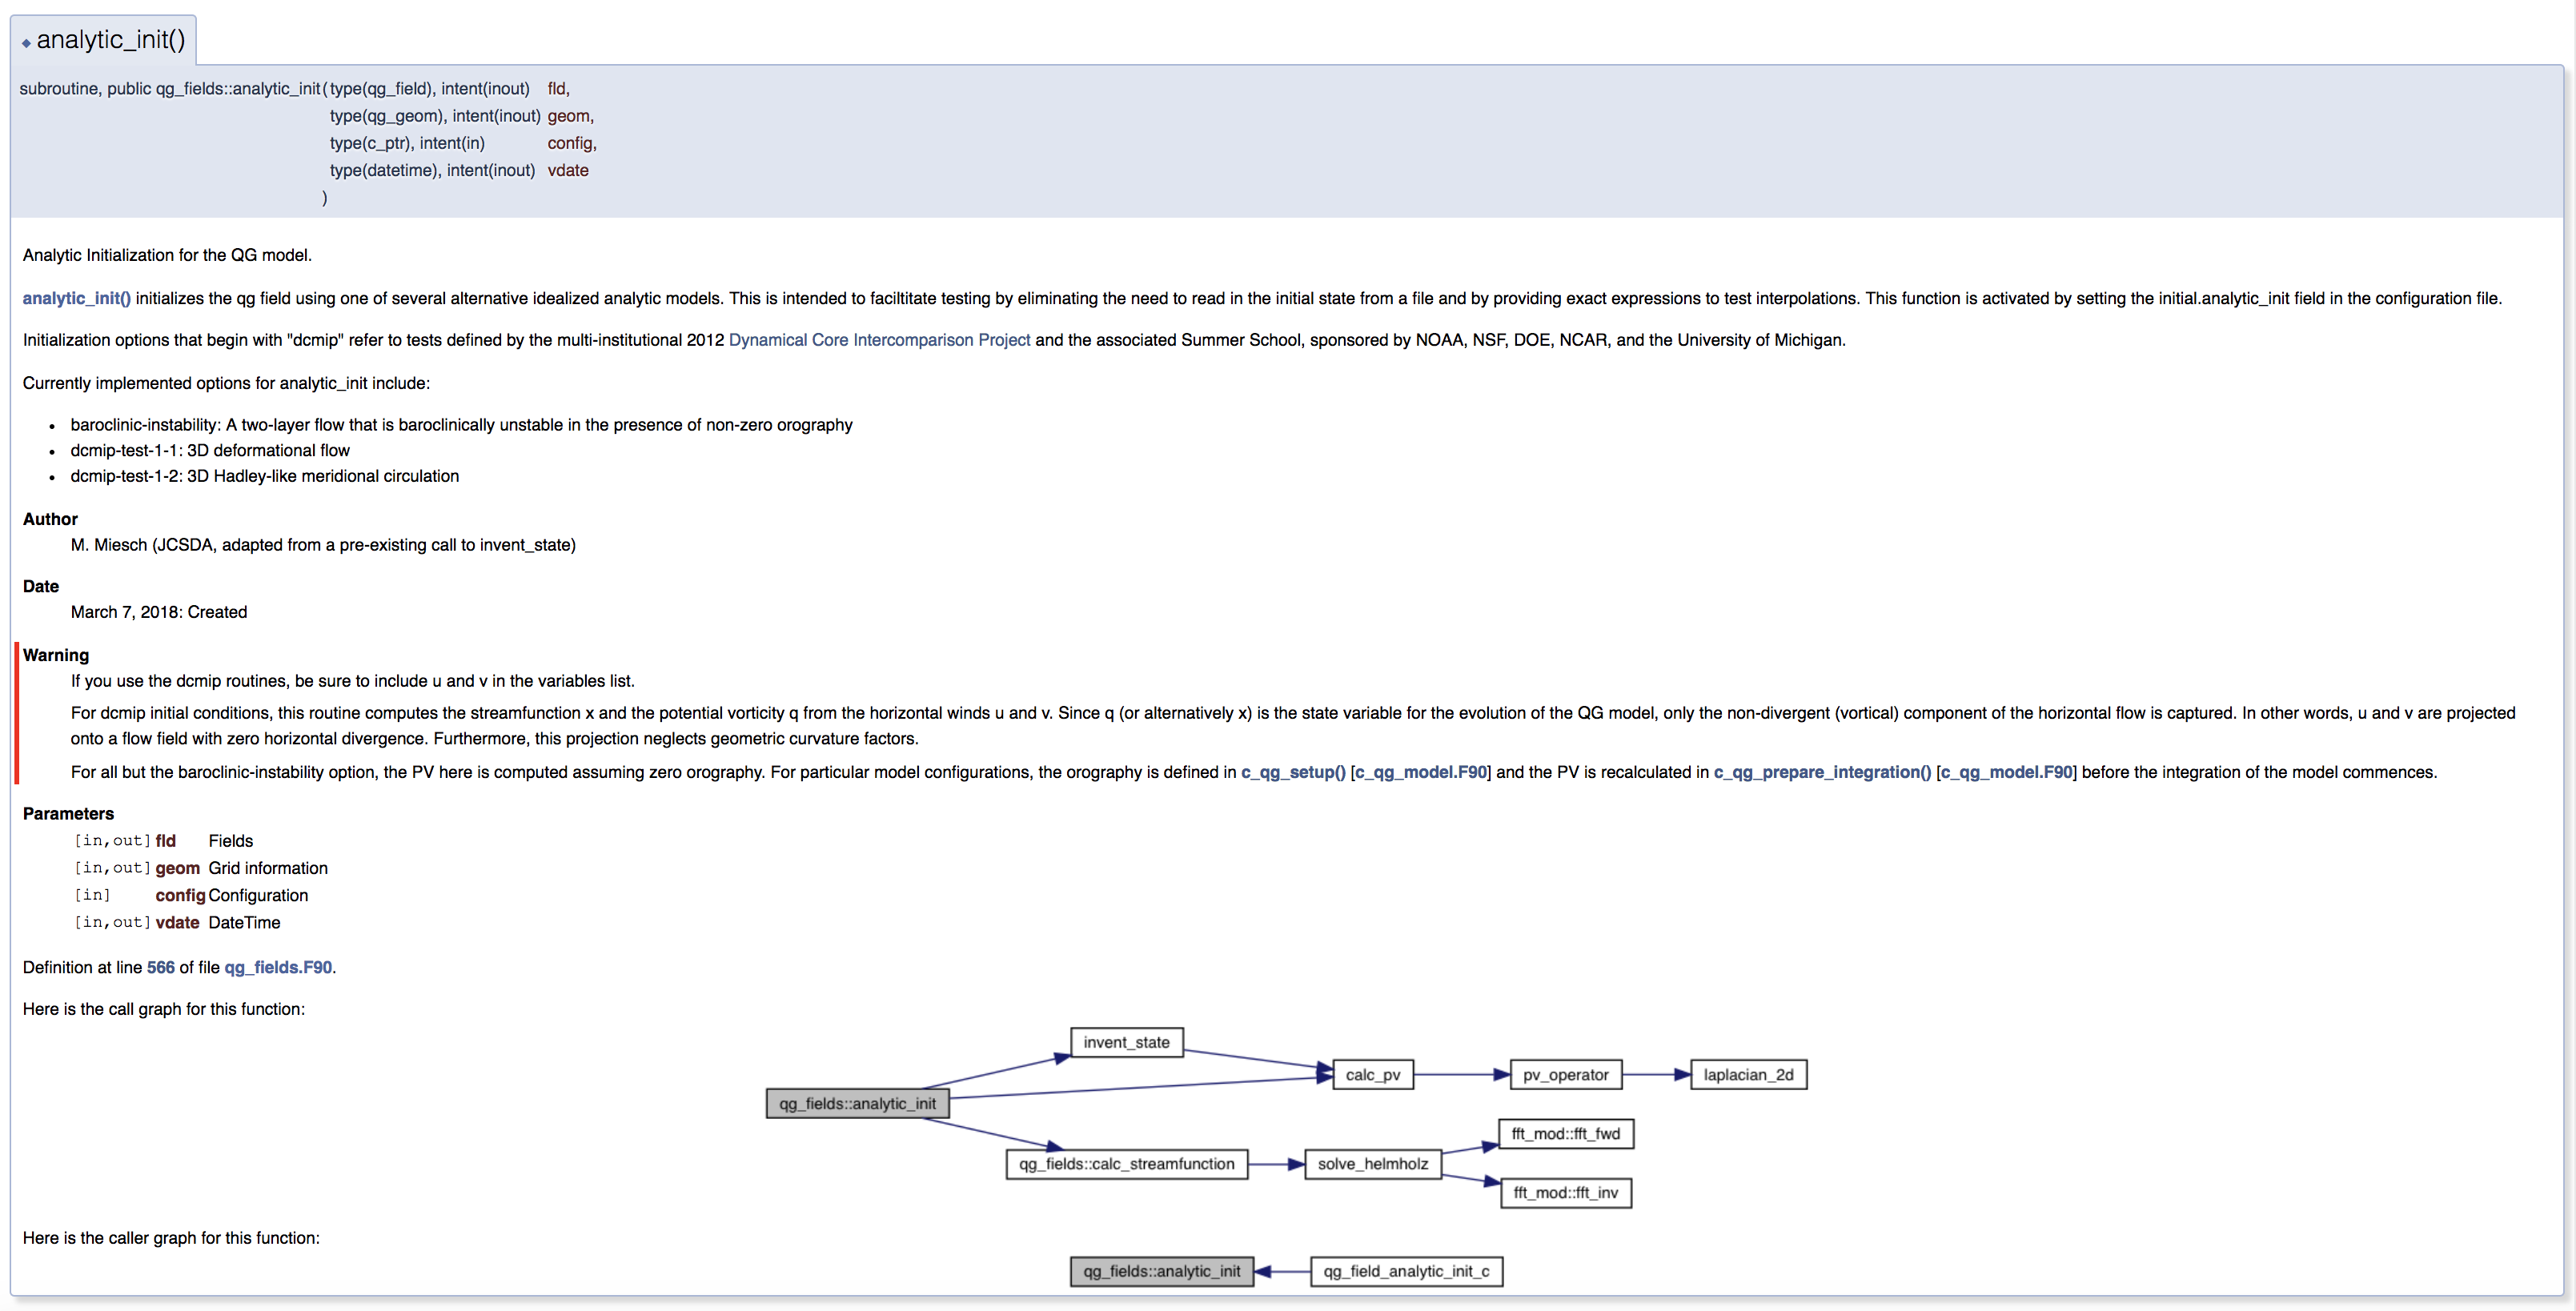
Selecting a file from the File List will let you see the documentation for the functions and classes it contains, including call diagrams. Here is an example of doxygen-generated documentation for a function - select the image for a closer look (note that most JEDI functions do not yet have this level of Doxygen documentation).
This is only the beginning - we encourage you to dive in and explore! For futher details on what you find, consult the Doxygen User Manual
Doxywizard and Customizing the Doxygen Build
Most JEDI repositories contain a Doxyfile configuration file (typically in the docs subdirectory) so there is no need for you to create a new one. Still, there may be situations in which you’d like to change look or content of the Doxygen documentation. You can either do this by editing the Doxyfile directly or using by using Doxywizard.
As mentioned above, Doxywizard is a convenient Graphical User Interface (GUI) for configuring and running Doxygen. It’s often installed together with doxygen as an optional extension.
To configure and run Doxygen with Doxywizard, just start up the application and begin filling in the menu items as shown here:
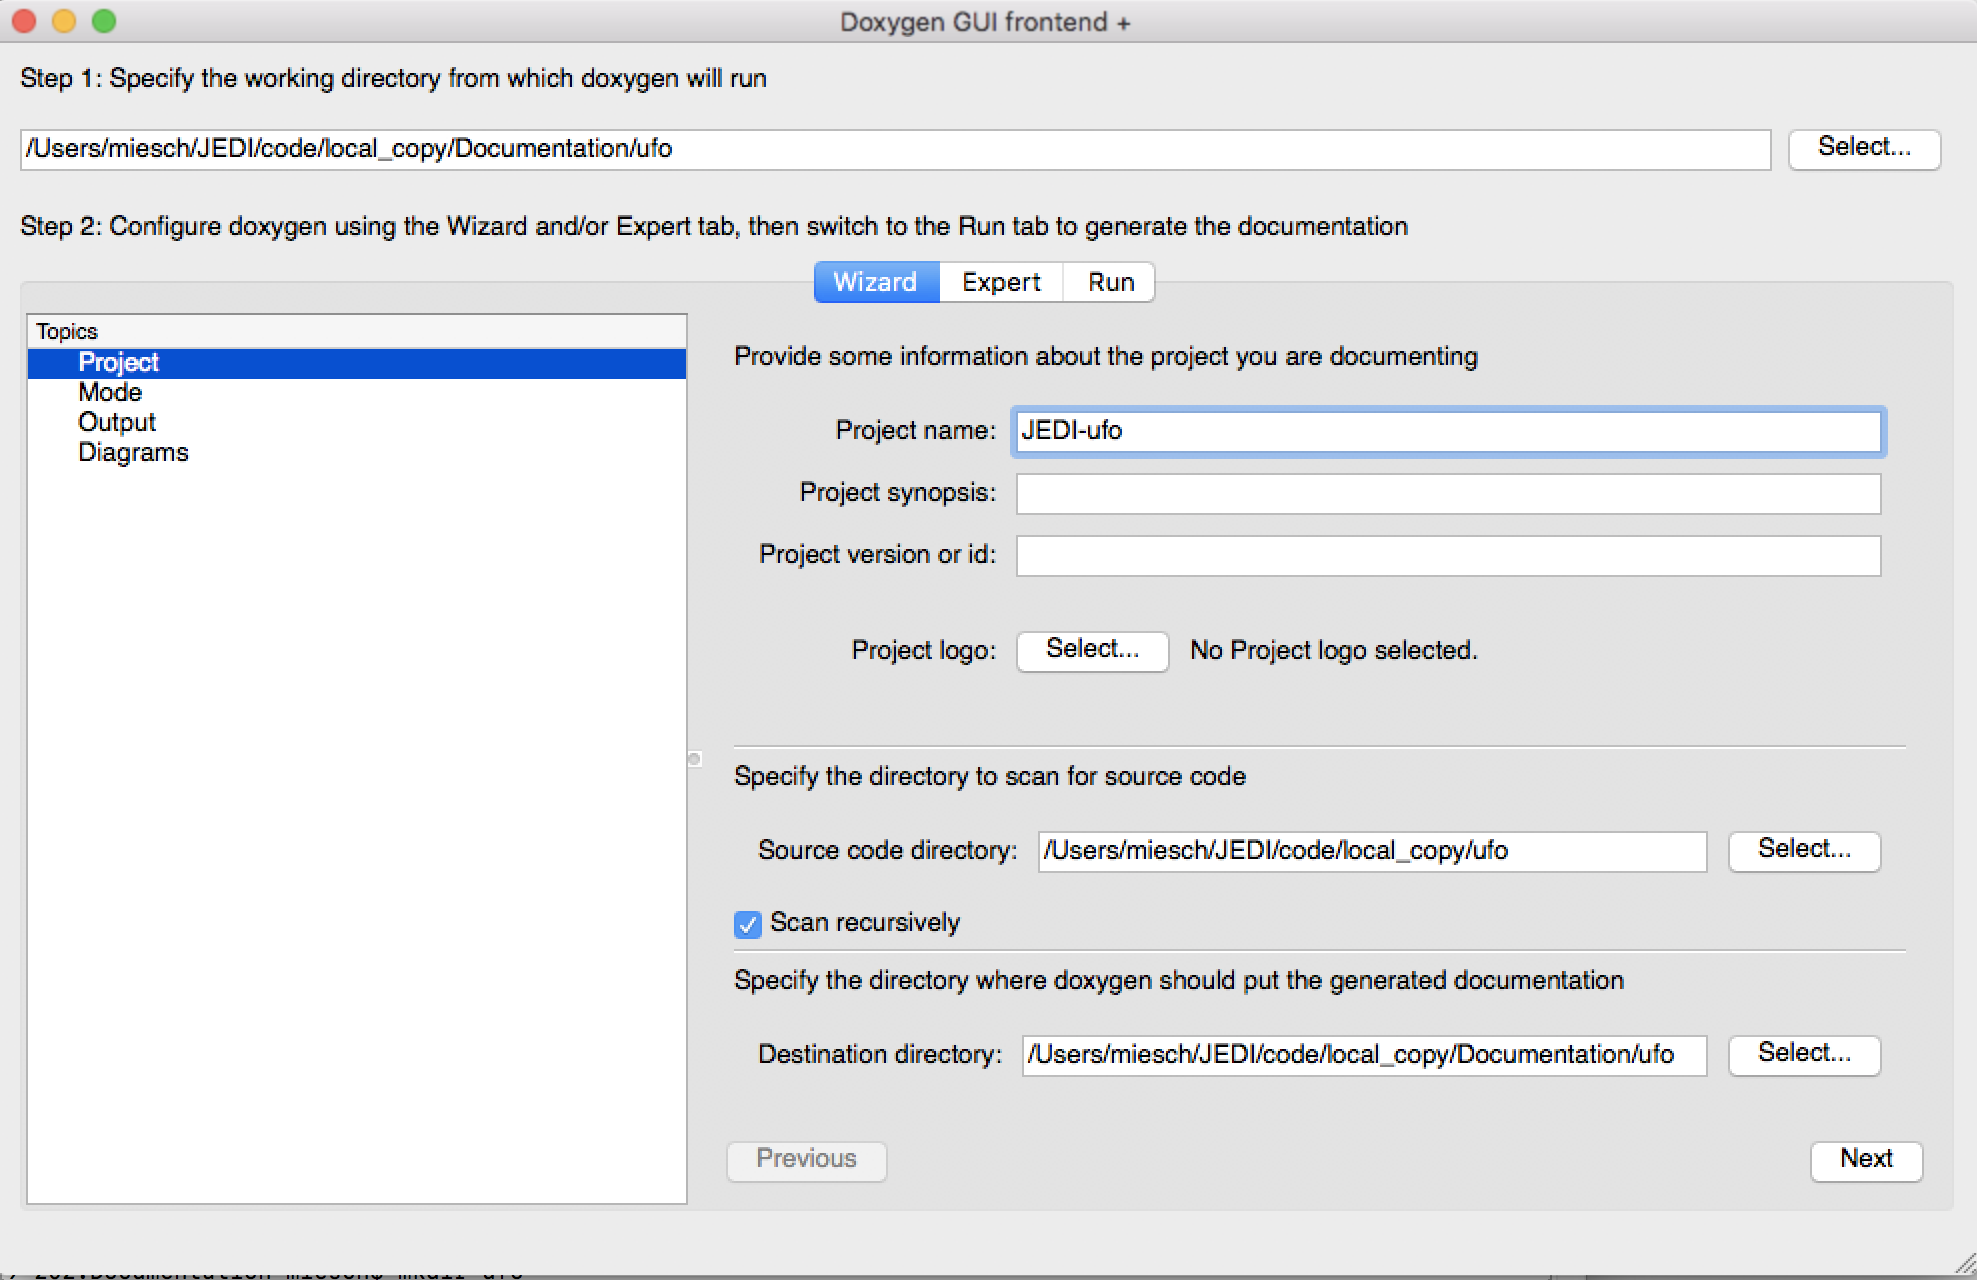
Take note in particular of Step 1 at the top, namely specifying the directory from which Doxygen will run. If you select Save when you exit Doxywizard, Doxygen will create a configuration file in this directory called Doxyfile that you can later load into Doxywizard (via the File-Open… menu item) or edit manually. Then specify the source code directory and the destination directory (the project name is optional).
Tip Be sure you select the Scan recursively option when specifying the directory for the source code.
Tip We recommend that you place the Doxygen output in a directory outside of the JEDI repositories. If you do select an output directory within the JEDI repos, please exclude it from your commits so your files are not uploaded to the main JEDI repos on GitHub.
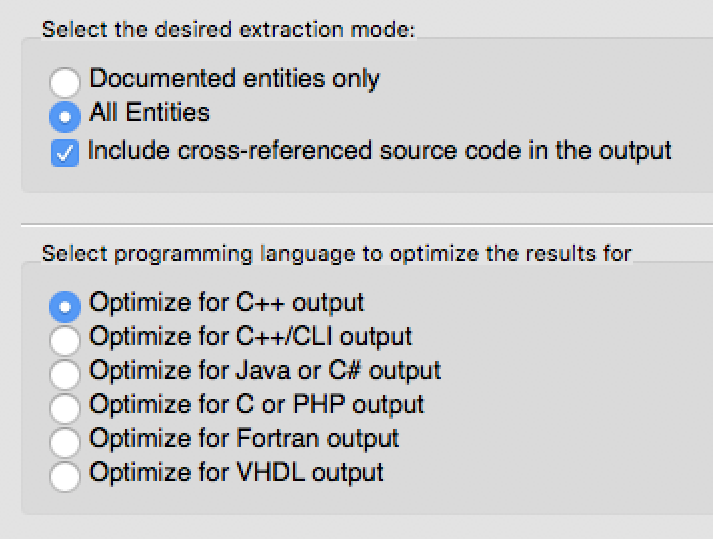
After you finish filling in this Project page, select Mode from the Topics menu on the left. Here make sure you select All Entries and Include cross-referenced source code in the output. Also, you may wish to optimize for either C++ or Fortran output.
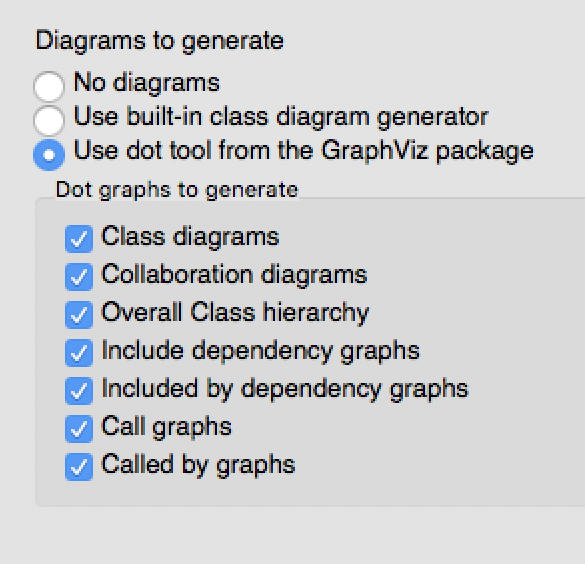
Then proceed to the Output menu item on the left and make sure html is selected. Then select Diagrams and, if you installed GraphViz as described above, select use dot tool from the GraphViz package. And, select the diagrams that you’d like dot to generate:
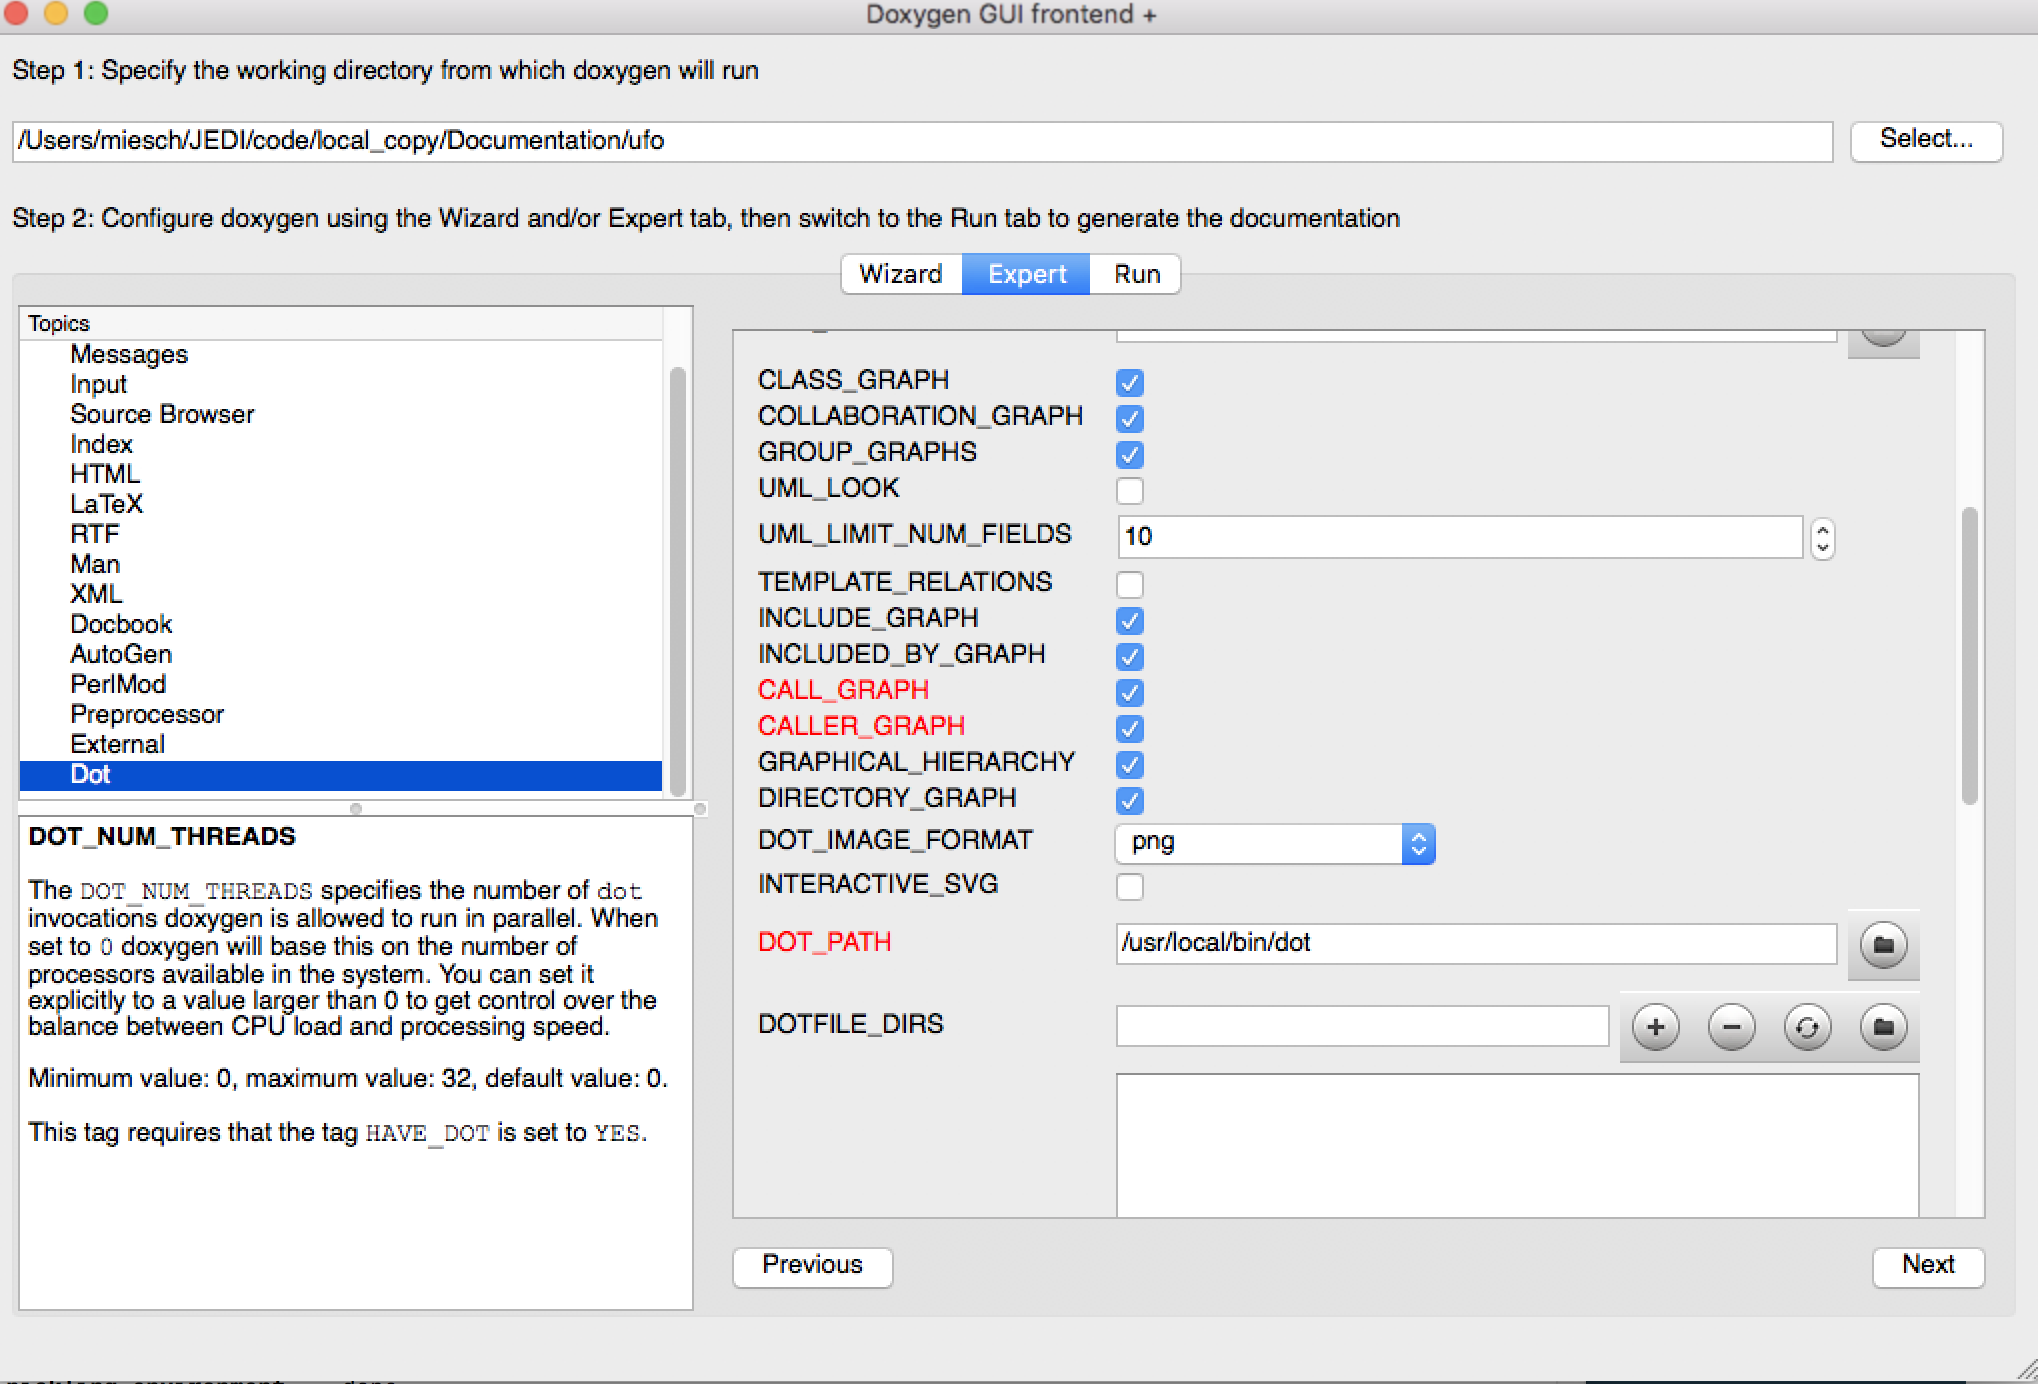
There is one more thing you may need to do in order to get dot to work correctly. Select the Expert menu item at the top of the window (between Wizard and Run) and scroll down the menu on the left to select dot. First make sure the HAVE_DOT item is checked and then scroll down to specify the dot path, which is likely /usr/local/bin/dot.
That is sufficient to run Doxygen but you may wish to browse some of the other items on the Expert menu, particularly under Build. When you’re finished, select Run from the top menu to get to the run screen and then select the Run doxygen button on the upper left to run Doxygen.
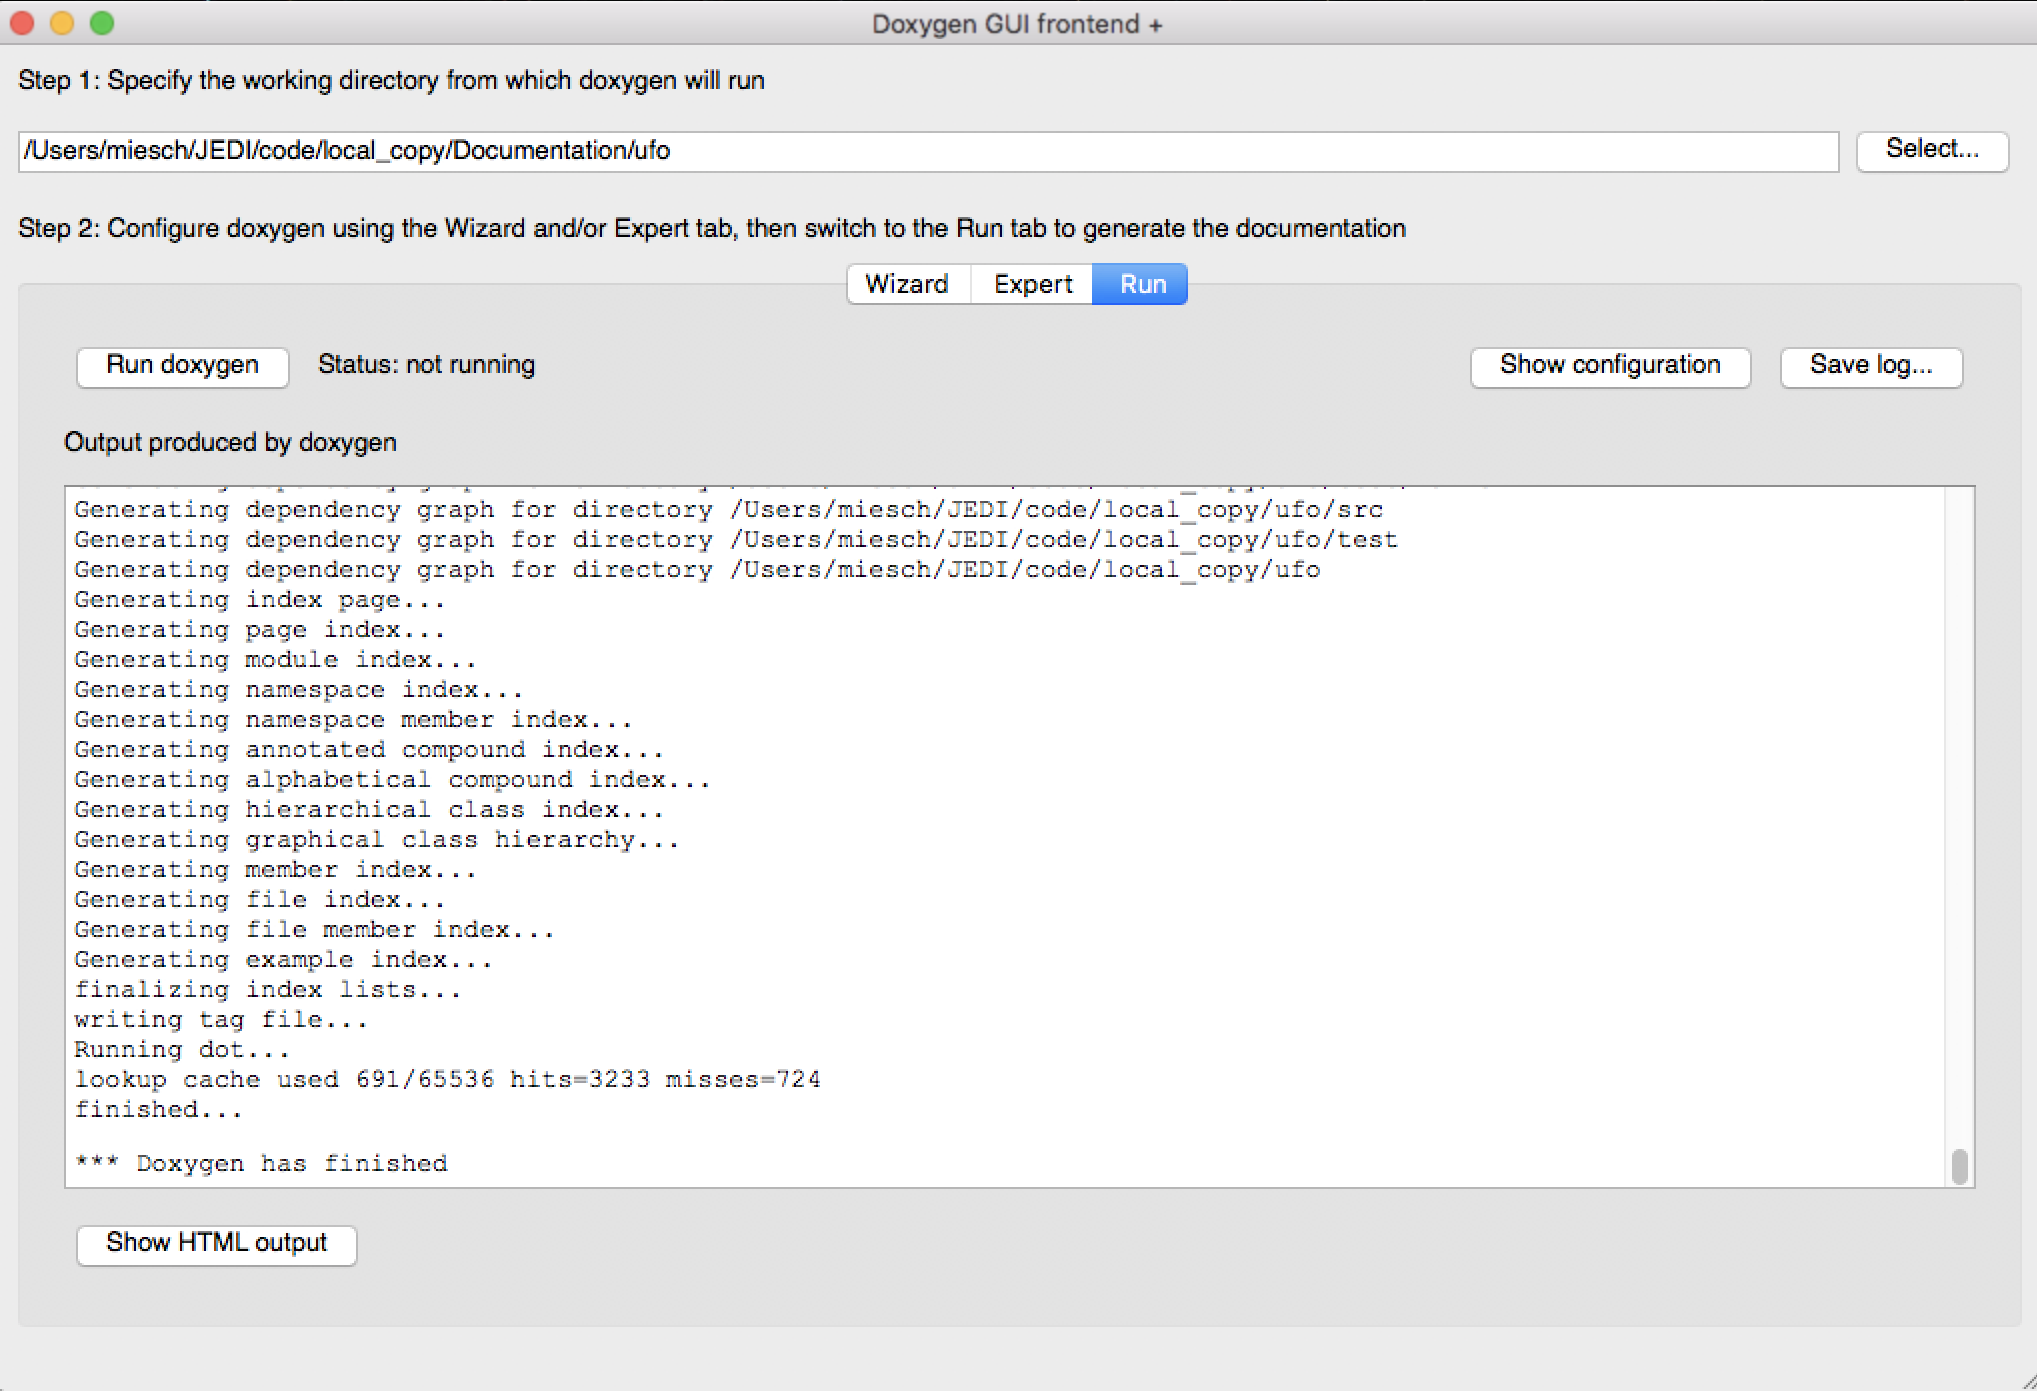
Wait patiently for it to run - it may take a few tens of seconds, particularly if you asked to generate many graphs.
If you’d rather not use the Doxywizard GUI, you can do all of the above and more by creating the Doxyfile configuration file manually from the command line and then editing it directly to select the options you want. To manually generate a Doxyfile, go to your directory of choice and type:
doxygen -g
Then, after editing the file to specify your configuration options (including the source and output directories), just type this thereafter (from the directory that contains the Doxyfile):
doxygen
To see the glorious abundance of configuration options, consult the Doxygen Manual.
If you have any problems, try consulting the Troubleshooting section of the Doxygen manual or the Doxygen tag on Stack Overflow - or email Mark (miesch@ucar.edu) or Steve (stephenh@ucar.edu).
To view the output as a man page, first make sure you have enabled the GENERATE_MAN option by selecting it in the Expert-Man menu of Doxywizard or by editing the Doxyfile. Then navigate to the man/man3 subdirectory of the output directory. There you can type ls to see what man pages are available to view. These include files, namespaces, directories, and classes. To view one, type e.g.
man ./qg_fields.3
The .3 extension (and the man3 directory name) refers to section 3 of the man organizational structure, which is typically reserved for library functions. You can change this by changing the Doxygen variable MAN_EXTENSION.
In the future, we plan to maintain a central directory tree for the man pages that you will be able to include in your MANPATH, thus avoiding the ./ syntax above. But this is still under development.